How do I link Contentful with Scompler?
Contentful is a cloud-based content management platform that helps companies to create, manage and distribute digital content efficiently. This guide explains how to integrate this service into Scompler.
NOTE: Please note the following before starting the integration:
- If you want to integrate Contentful into your project, please get in touch with us, for example, via support.
- For the Contentful integration to appear, it first needs to be activated for your user group in the settings:

- The user interface in Contentful is only available in English.
- Only Contentful administrators can connect Spaces to Scompler.
Integrating Contentful
To connect your project to Contentful, go to the “Connections” tab in your project settings and scroll down to the “Contentful Spaces” section.

Here, you'll see an overview of the Spaces you have already connected. Click on “Login with Contentful” to add a new Space. During this setup, click on “Authorize” to grant Scompler to access your Spaces. Your Contentful account is now linked to Scompler.

Next, go to the “Content Types” page in the Strategy section and create a content type that will be linked to the Contentful space. To do this, click on “New Content Type” in the upper right corner.
Go to the “Contentful” tab and select the Contentful Space (1) and the content type (2) within Contentful.
NOTE: Once a Space has been linked to a content type, it can't be changed. If you want to remove a Space from Scompler, you have to delete the Space on the connection page and the content type. When you want to integrate a new Space from Contentful, you have to link it to a new Scompler content type.
Creating suitable fields
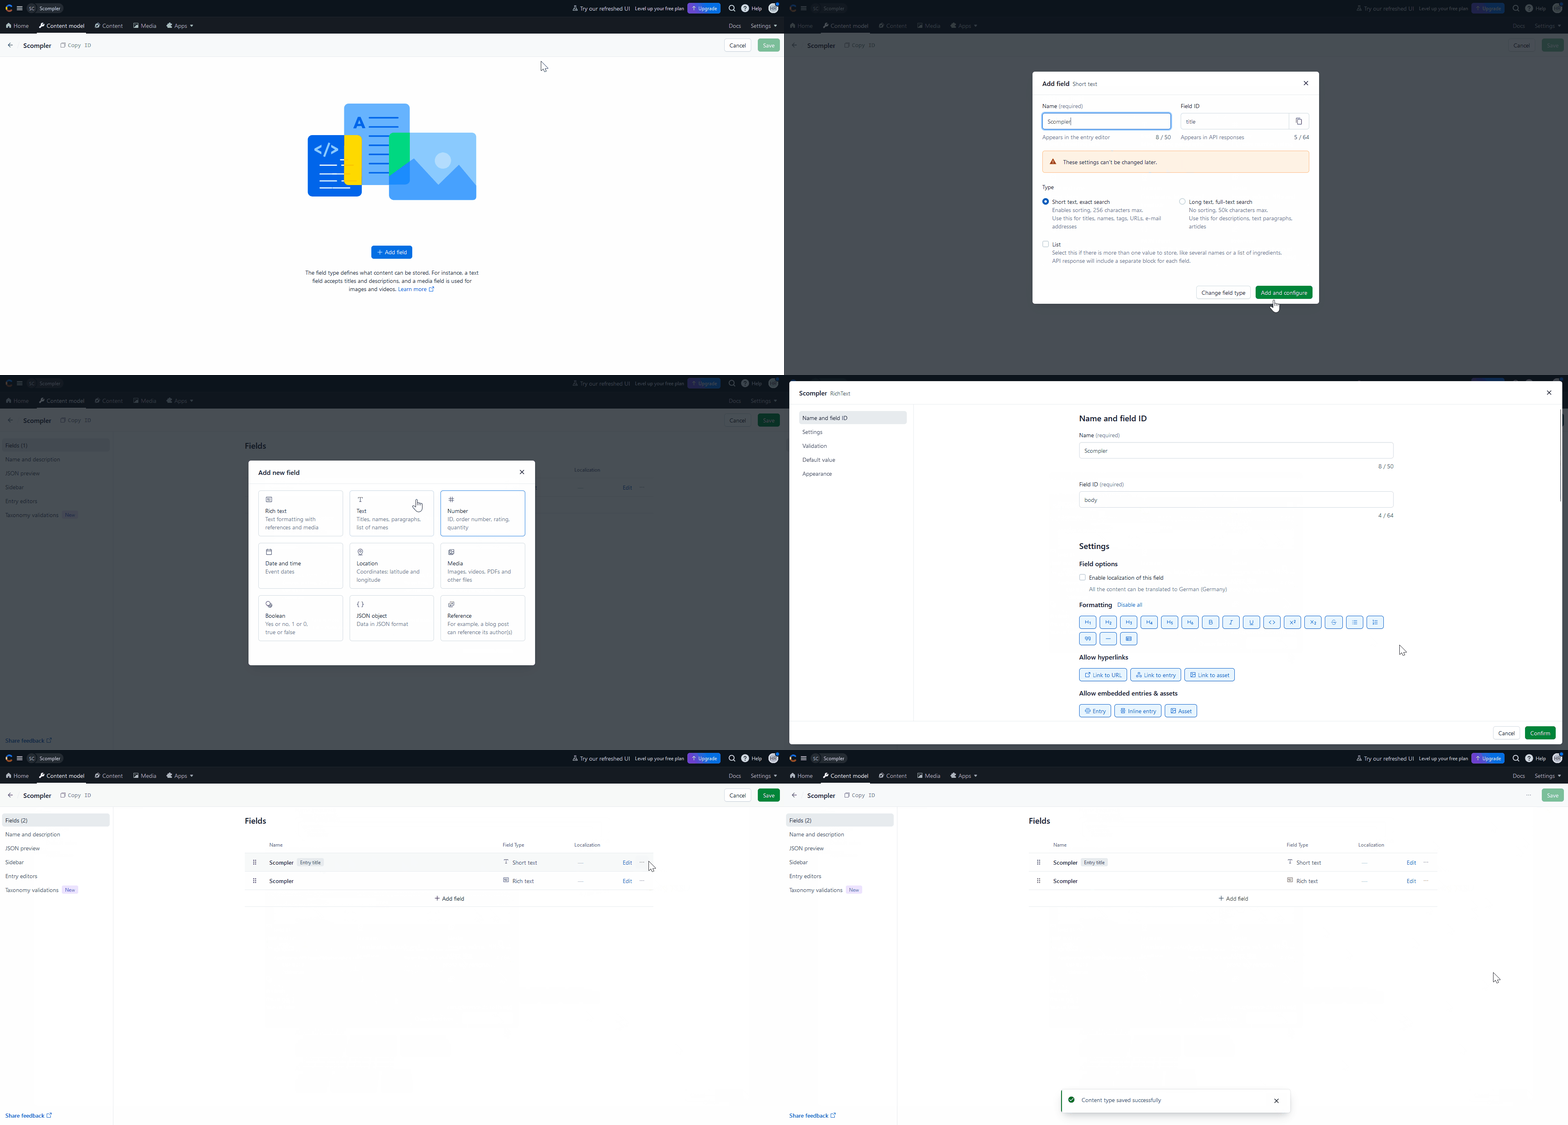
To display content in an article in Scompler, go to the “Content Model” area in Contentful, select your content model and create the necessary fields:
Start by naming the “Entry title” by entering the name “title” in the “FieldID” field. For the “Rich Text” field, enter a name and set its field ID to “body”.
NOTE: Without these two fields, nothing will be displayed in Scompler. Currently, only the fields “Entry Title” and “Rich Text” are displayed in Scompler. Also note that, currently, video previews and tables cannot be displayed from Contentful.
Linking entries from Contentful to Scompler articles
Now you have two options for linking your entry in Contentful to the article. In the “Article” tab of the article card, click on “Create” (1) to create a new entry in Contentful. An individual link will be created. If, on the other hand, you enter a predefined link for the entry in Contentful in the field (2) and click on “Connect”, this entry will be linked to the article.

You will find the link to your content entry in your Contentful account in the “Content” tab. Right-click on the entry and click on “Copy link” to copy the link for the relevant entry. The labelling may vary depending on the Internet browser you are using.
NOTE: Only one content entry can be linked to an article.
Once linked, the Contentful article in Scompler should then look like this:

NOTE: The “Unpublished changes” button shows content from your Entry that has not yet been published and that is marked as “Draft”.
Scompler automatically adopts the status changes of your Contentful entries, which are managed in Contentful. These are the currently available statuses:
| Contentful | Scompler |
| Draft | In Production |
| Published | Published |
| Archived | Archived |
| Scheduled | Approved |