Prerequisites:
- You are using Community Management (paid add-on)
-
You have administrator rights
There are several ways to connect channels to Community Management, depending on whether they are already connected to Scompler or not:
Once connected, you can optionally restrict the access to channels within Community Management.
Add a New Channel to Community Management
To add a new channel to Scompler and use it in Community Management, follow these steps:
- Navigate to Project Settings > Apps > the app for which you want to connect a channel, and connect the channel.
- Navigate to Apps > Community Management.
- Under Getting started click Select channels.
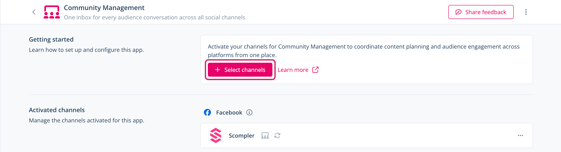
The Activate Community Management dialog opens. It displays channels that can be activated for Community Management. - Select the channels you want to use within Community Management.
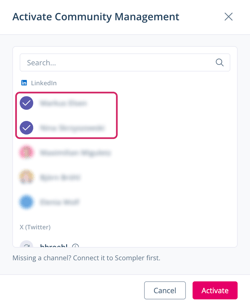
- Click Activate.
You have connected the channels to Scompler and enabled them for Community Management. You can now view incoming interactions on the channels in Community Management and manage them from there. Optionally, you can restrict the access per channel.
Add an Already Connected Channel to Community Management
If you want to use an already connected channel in Community Management, follow the instructions for the respective channel:
Add connected X, LinkedIn, YouTube, and TikTok channels to Community Management
To use an already connected X, LinkedIn, YouTube, or TikTok channel in Community Management, you must reconnect the channel.
Do not delete the channel, as this can lead to unintended data loss, such as connections between channels, articles, etc.
- Navigate to Project Settings > Apps > the app for which you want to add an already connected channel to Community Management.
- Under Getting started, depending on the network, click one of the following:
- Connect (X, LinkedIn)
- Sign in with Google (YouTube)
- Login with TikTok (TikTok)
- Follow the instructions on your screen to complete the reconnection.
- Navigate to Apps > Community Management.
- Under Getting started click Select channels.
The Activate Community Management dialog opens. It displays channels that can be activated for Community Management. - Select the channels you just reconnected.
- Click Activate.
You have reconnected an already connected channel to Scompler and enabled it for Community Management. You can now view incoming interactions on this channel in Community Management and manage them from there. Optionally, you can restrict the access per channel.
Add connected Facebook and Instagram channels to Community Management
To add an already connected Facebook or Instagram channel to Community Management, you’ll need to make some changes both in Scompler and on Facebook.
- Navigate to Apps > Community Management.
- Under Getting started click Select channels.
The Activate Community Management dialog opens. It displays channels that can be activated for Community Management. - Select the Facebook or Instagram channels you want to use within Community Management.
- Click Activate.
You have enabled an already connected Facebook or Instagram channel for Community Management. Now you need to update a few permissions on Facebook itself.
- Open the Business Integrations page on Facebook.
- Under Apps, click Remove next to Scompler.
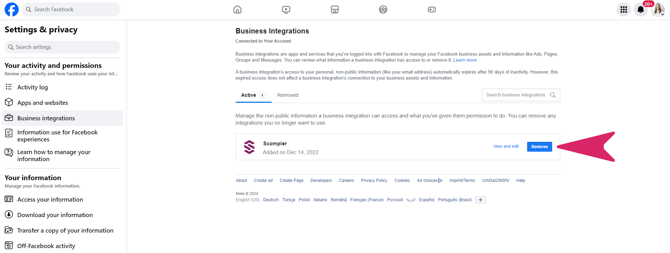
You must delete the Scompler app from Facebook because your Facebook account currently only allows Scompler to publish posts and/or import performance data. To use Community Management, you must add the permission for Scompler to import information about user actions. This can only be done by resetting all permissions.
You have updated the required permissions on Facebook. To view incoming interactions in Community Management, you must now reconnect the channels in Scompler.
Follow these steps for both Facebook and Instagram.
- Navigate to Project Settings > Apps > the app for which you want to reconnect a channel.
- Under Getting started, click Login with Facebook.
- Follow the instructions on your screen to complete the reconnection.
On Instagram, make sure the Allow access to messages setting is enabled. To do this, log in to the corresponding Instagram account in the mobile app and navigate to Settings > Privacy > Messages > Connected Tools. Here you will find the relevant setting and can enable it if necessary.
You have reconnected an already connected Facebook or Instagram channel to Scompler and enabled it for Community Management. You can now view incoming interactions on this channel in Community Management and manage them from there. Optionally, you can restrict the access per channel.
Managing Access to Connected Community Management Channels
Per default, all user groups have access to the activated channels in Community Management. If you want to restrict the access, follow these instructions:
- Navigate to Apps > Community Management.
- Under Activated Channels, click the three dots > Manage access next to the channel you want to restrict access to.
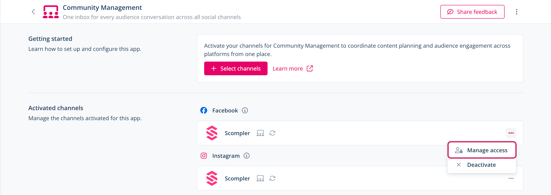
A dialog opens. - In the User Groups With CM Access dropdown menu, select the user groups that should have access to this channel in Community Management
- Click Save.
You have restricted the access to a channel in Community Management. Now, only the selected user groups can view and manage incoming interactions on the respective channel.